Installing custom certificates into vCenter 6.7

First of all, you will need three certificates in the following format:
- root.cer of the Root CA (it can be internal or external CA). If you have an intermediate certificate, you must join the two certificates. Please check this article to do so;
- certificate.cer generated by the Root/Intermediate CA. This is the certificate with the DNS name(s) that you want to change in vCenter. Something like vcenter.domain.local;
- certificate.key of the main certificate (this is the private key)
- Convert PFX to CRT/CER with certificate and private key
openssl pkcs12 -in certificate.pfx -clcerts -nokeys -out certificate.cer
openssl pkcs12 -in certificate.pfx -nocerts -out certificate.key
- Convert PEM to PFX
-
Convert to multiple formats using a WebTool
With this certificates you are ready to start:
1. SSH to the vCenter server
2. Run the following command to enable and access the Bash shell:
shell.set –enable True
shell
3. In the Bash shell, run the following command to change the default shell to Bash:
chsh -s "/bin/bash" root
4. Copy the three certificates to vCenter server with WinSCP or similar. Copy them to /root/cert/
5. Return to the Appliance Shell by running the following command:
chsh -s /bin/appliancesh root
6. Enter the following command to manage the certificates
/usr/lib/vmware-vmca/bin/certificate-manager
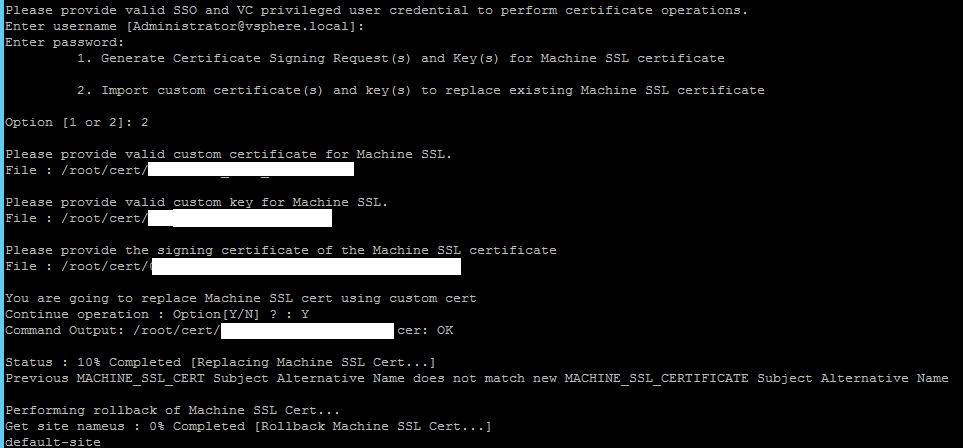
7. Choose option 1
8. Provide the username and password of vCenter administrator
9. Choose option 2
10. Enter the full path to the main certificate.cer
11. Enter the full path to the main certificate.key
12. Enter the full path to the root CA root.cer
Command Output: /root/cert/certificate.cer: OK
Status : 10% Completed [Replacing Machine SSL Cert…]
Previous MACHINE_SSL_CERT Subject Alternative Name does not match new MACHINE_SSL_CERTIFICATE Subject Alternative Name
Performing rollback of Machine SSL Cert…
Get site nameus : 0% Completed [Rollback Machine SSL Cert…]
- hostname.domain.com
- cname.domain.com
But vCenter was expecting the following SANs:
- hostname(s)
- ipv6address
So, the simple solution is to create another certificate with IPv6 SANs (not for me, because it was a external certificate) or just disable the SAN check in the Python Script!
1. Edit with vi the file: /usr/lib/vmware-vmca/bin/certificate-manager
2. Comment line 594 and line 595 (see below)
# if var.strip() in ['1']:
# iscomparerequired = compare_certificate_san
or
# if var.strip() in ['1']:
# iscomparerequired = compare_certificate_san_to_pnid(cert_file)
3. Re-run the certificate manager
4. Check if everything is ok.